Source: Traveling with trays
Traveling with trays

The complete set of our in flight activity containers and two trays, ready for take off.
We are heading to California this week so I’ve been gathering items to surprise my boys with for our plane ride. I picked up some new coloring books and stickers, and finally invested in some Crayola Color Wonder markers and paper. I also liked the idea I found on Pinterest of decorating the plane window with gel clings, so I added those to my cart in the dollar section at Target.
Beyond that, I spent some thinking about how we work and play at home and what would make the boys feel comfortable on the long flights but also in the hotels during our ten day trip. The first thing that came to mind was how we pretty much always define workspaces with trays and immediately about a dozen lightbulbs went off at the…
View original post 394 more words
Filed under Uncategorized
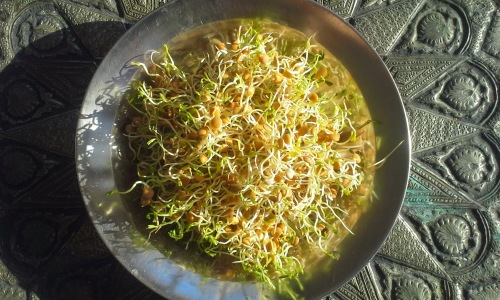
How to sprout anything (a sprouting hack)
This ‘recipe’ is more of a tutorial, which relates as much to food growing as to cooking. It is also my first recipe featuring a hack (an unpolished yet efficient way to get something done). A friend passed on to me the brilliant idea of reusing a plastic mesh bag.
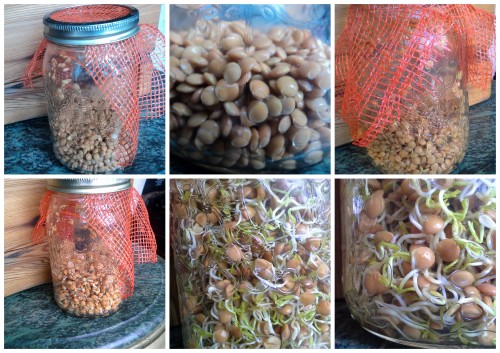
The pictures really explain it all, but here is how to sprout seeds in a jar:
(1) Fill the jar about 1/5 full of beans or seeds (lentils, chickpeas, radish seeds, wheat berries, any grain that is not broken or hulled).
(2) Soak in water several hours or overnight.
(3) Place a ‘filter’ cut into a square on top (a reused plastic mesh garlic bag is ideal, but a cheese cloth or doubled up coffee filter will work) and secure with a rubber band or mason jar ring. If you have a plastic ring you are the boss, the metal ones eventually get rusty. I used an orange onion bag because I was in a pinch. Not sure about its food safety, but it got the job done.
(4) Dump out the water through the top with the lid and filter secured and let the jar rest tilted in a bowl in a sunny spot.
(5) Rinse it at least a couple times a day like this, or whenever you walk by.
(6) Eat the sprouts as soon as they start growing (a great time to cook them into a soup) or as long as they are fresh and smell good. You can slow down the growing process by storing them in the fridge for a few days (this may be necessary in a warm climate), but eating them right away is best. Always rinse right before you want to eat them.
(7) How should you eat them? I mostly like them raw in salads or on sandwiches. But, you can also cook spouted beans into soups, curries etc. This may be necessary for chickpeas. I have yet to try making this, but the healthiest breads are made with sprouted grains.
Let me know how your sprouts sprout, or contact me with questions. My facebook page is just facebook.com/auberginepizza.
Filed under Uncategorized
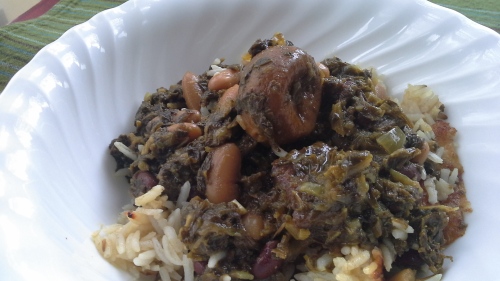
Persian Ghormeh Sabzi: A Real Food Recipe for Spring
To say ghormeh sabzi is a popular dish in Iran would be an understatement. The recipe is so old it is said that it was served to Alexander the Great by the ancient Persians and he fell in love with it. I really can’t say enough about this stew; even young children love it (after they get past the green color). A Persian friend of mine once told me that ghormeh sabzi is the equivalent of mac and cheese in North America: it’s Persian comfort food.
Fortunately, this is the perfect time of year for this dish since fresh herbs are the key ingredient. But it’s also great in fall when you have lots of extra kale from your garden. You will be chopping a lot of greens because once sauteed, they reduce significantly in size. However, don`t count on all the green leafy vegetables in this stew to provide you with loads of calcium and iron and stuff. Most of the nutrients will be destroyed in the long cooking process. The delicious flavors it develops are well worth the trade-off, though. I have slightly altered the traditional recipe to make it more real-food-friendly. Soaking the beans overnight is an important part of the preparation. That said, this recipe could easily be made paleo by omitting the beans and serving it over cauliflower rice.
Oh, and it’s fantastic as leftovers.
Persian Ghormeh Sabzi
- 1 bunch spinach or kale
- 1 bunch green onion (or garlic scapes, or leeks, or 2 bunches chives)
- 1 bunch parsely
- 1 bunch cilantro
- 1/2 bunch mint
- 1 onion
- 5-6 cloves garlic
- 1 1/2 lb stewing meat (I like bone-in)
- 1 cup dried red kidney beans
- 5 dried limes
- 2 cups beef bone broth (optional)
- 2 cups water
- 1 tsp turmeric
- 1/2 tsp cumin
- 1/2 tsp curry powder
- salt
- pepper
1. Finely chop the onion and garlic. Heat olive oil in a heavy pan, add onions and garlic and cook until slightly soft. Increase the heat, add the meat and sear on all sides. Add the spices, and salt and pepper to taste. Pour in the water and bone broth (or 4 cups of water), the dried beans and the dried limes. Stew on medium for about 1 hour, or in a slow cooker on high for about 2 hours.
2. Finely chop the fresh greens and saute in butter until dark green and about one fourth the volume. Add to the stew and cook for another 3 hours or until the meat is tender, the beans are cooked and the greens turn very dark. In a slow cooker, it will be about 6 hours on low (or longer-it only gets better).
3. Serve over white basmati rice that has been pre-soaked for at least an hour.
Filed under Recipes
The Kitchen Garden
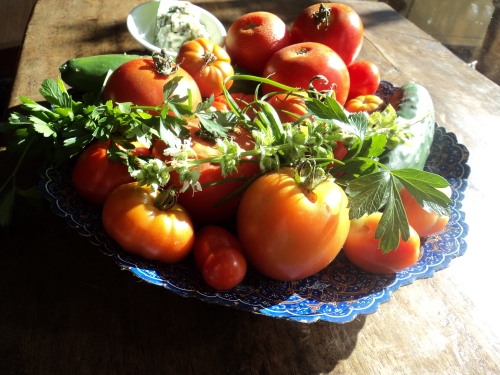
It’s time to harvest; tomatoes, cucumbers, basil, parsley, squash, mint are all begging to be brought inside and cooked, preserved, fermented and/or dried. Though, if you are an edible food in my garden, more likely placed directly on a plate as salad. More recipes will come on cooking from the kitchen garden. But, for now, a bit about the garden.
Our kitchen garden was designed based on some simple permaculture ideas. We are novices in this field, but we are guided by the principles of using local resources, planting edible fruits, keeping your herbs and annuals close to the house so you can tend to them, building garden beds that require little irrigation, composting EVERYTHING, planting a “food forest,” and generally establishing systems that take a while to create but are low maintenance and autonomous in the long run.
My favorite permaculture technique? Hugelkultur. Long story short, hugelkultur entails burying logs or big sticks underneath your layers of compost, leaves, mulch, soil etc. Why would you do this? Less irrigation for starters. (I watered my vegetable garden 3 times this summer, after planting). Lots of oxygen for the plant roots is another reason. Third, if your compost is like mine and comes mostly from kitchen scraps, the carbon in the wood (brown stuff) balances out all the nitrogen from your kitchen waste (green stuff). The result? We are harvesting zuchinni, basil, crookneck squash, bushels of cucumbers and lots of beans and peas; all out of a bed we hardly watered. And they taste amazing.
Let us know: what are your favorite fruits or vegetables in season right now?
Filed under Eating local, food
Carrot Cupcakes and Carrot Jam.
Guess what vegetable is in season? We just bought a 25 pound bag of them, and can’t make enough carrot juice. The bag is emptying surprisingly quickly. Fast enough that I have checked our skin to make sure it doesn’t turn orange. Yes, it can happen.
This recipe is gluten-free. The flour blend is 2 parts brown rice flour, 1 part teff flour, 1 part chickpea flour. The carrot jam decorative topping is originally a Persian recipe. So easy to make- just julienne some carrots and put them on the stove with 3 tablespoons of water, sugar (to taste), and some cardamom pods. Cook them until they are quite soft.
Recipe for Gluten-free Carrot Cupcakes:
- 3/4 cup brown sugar
- 1/3 cup melted butter
- zest of 1 lemon or half an orange
- 1 teaspoon vanilla extract
- 1/2 teaspoon baking soda
- 1 teaspoon cinnamon
- 1/4 teaspoon nutmeg
- 1/2 teaspoon salt
- 3/4 cup plus 2 tablespoons gluten-free flour blend (above)
- 1 1/2 cup shredded carrots
- 1/2 cup pecans, chopped
- 1/4 cup shredded coconut, unsweetened
Combine the wet ingredients, then add the dry ingredients spices first, then the flour and the last 3 ingredients. Bake at 350° for 25 minutes in a greased muffin tin. Makes 12 cupcakes.
I made a butter cream cheese frosting for the top, put it in the fridge for a good hour, then decorated the cupcakes with the carrot jam. You can decorate with extra coconut or pecans, too.
Filed under local food, vegetarian
Vegan Burgers
These falafel burgers are lightly fried, and then baked. This makes them much less greasy, but maintains the delicious crunchiness. We served them on fresh organic blue corn tortillas, to make them gluten-free. Most traditional Mexican tortillas are made with nixtamalized corn (a process of soaking the kernels in wood ash), which releases its nutrients and rids it of toxic phytic acid. Organic corn is the best because it is free of GMOs. (Assuming that pesky wind didn’t cross-polinate any of the crop with some frankenpollen).
The recipe for the burgers depends on your preference. The basic ingredients are chickpeas, fava beans, onions, garlic, parsley, and thyme. These get blended in the food processor. To this you can add an egg for stickiness and grated potato sweet potato. The result should yield a doughy mix that can be formed into patties. Lightly fry them on either side, then continue cooking in a 350° oven until crispy, about 15 minutes.
Filed under food, Recipes, vegetarian
A Handmade Gift
In general, I prefer to use my teapot to brew loose leaf tea. When we make Persian black tea, we use a special pot to brew the leaves over heat. It tastes better than teabags, and wastes less.
But, when brewing spiced chai (Masala chai), it is best to steep the the tea in a pot of milk on the stove. These teabags make it simple to do this. I made these as a gift for a dear friend, and sent them by mail.
 The tea mix is loose leaf ceylon tea with ground spices (I always grind them myself). I used cardamom, cinnamon, clove, fennel seeds, powdered ginger and a little nutmeg and black pepper. I used some coffee filters I had lying around, and red thread. You must double up the filters as they break apart easily. Do not overfill them! Tea leaves expand many times their dried size when steeped.
You can cook the tea in milk, (1 cup per person), strain and sweeten with honey.
Filed under Uncategorized
Sumac Salad Dressing
Sumac is the best-kept secret of spices. It comes from a species of Sumac tree native to the Middle East and North Africa. The taste is subtle, so it’s best eaten raw. Persians simply sprinkle it on meats right on the plate, adding a slightly sour lemony taste. You can find it at spice shops and Middle Eastern specialty stores.
I make this salad dressing in large batches in a mini-blender, so it lasts a few weeks. The onions actually improve (as in become less spicy and more sweet) in the lemon juice as it sits in the fridge. It tastes amazing on salads, falafel, french fries, or just as a dip. The amount of lemon juice should be almost the same as the other wet ingredients. Use equal portions of olive oil and tahini. If you blend it, stir in the sumac at the end so it doesn’t lose its texture.
Sumac Salad Dressing
- Tahini
- Olive oil
- Lemon juice
- Onion, blended until smooth
- Mustard
- Salt
- Sumac
- Honey (optional)
Filed under food, vegetarian
Danish Apple Pancakes (Ebelskiver)
Danish pancakes are made in a special cast-iron pan with small half-circles. If you don’t have one, you can find it here. I use mine for many recipes besides the typical breakfast pancake- cheddar corn cakes, teff flour chocolate desserts, even small potato latkes. The pancakes shown here are like tiny muffins, perfect for eating right out of your hand or dipping into hot coffee.
The wonderful thing about these pancakes is you can stuff them with brie or chocolate chips to get a delicious melted center. Traditionally, they were served with a fruit or jam inside. The recipe that follows calls for a pecan in the middle, making them a little more substantial.
Danish Apple Pancakes
- 2 eggs, separated
- 2/3 cup buttermilk
- 1/4 cup coconut oil, melted until liquid
- 1 apple, grated
- 3/4 cup brown rice flour
- 3/4 cup oatmeal, soaked
- 1/3 cup pumpkin seeds
- 1 1/2 teaspoons baking powder
- 1/2 teaspoon baking soda
- 1/2 teaspoon salt
- 1/2 teaspoon cardamom
- handful of pecans
Mix together the dry ingredients, except the pecans. Add the buttermilk, oil, apple, and the egg yolk. Beat the egg whites until stiff and fold into the batter. Allow batter to sit for 10 minutes.
Add a little butter to the ebelskiver pan and fill each hemisphere with batter. Place a pecan in the middle of each pancake and press down with a spoon until it is submerged. When the batter begins to bubble, flip the pancakes using wooden chopsticks or a plastic spoon. This takes a little practice; you can start by turning them 90 degrees first, then 90 degrees again until they are fully inverted. Serve warm with jam.
Filed under Recipes, vegetarian


